[toc]
配置存储ConfigMap概述
为什么要用configMap?
1
2
3
| 1.将配置文件和POD解耦
2.可以修改配置文件 /etc/nginx/nginx.conf /etc/php-fpm.d/www.conf
3.可以增加配置文件 /etc/nginx/conf.d/www.chenlin.com.conf
|
ConfigMap如何存储配置文件?
1
2
3
4
| 1.键值对存储
key:value
2.文件存储
文件名:配置文件内容
|
ConfigMap支持的配置类型?
1
2
| 1.直接定义key:value键值对
2.基于文件创建键值对
|
ConfigMap创建方式
如何将ConfigMap存储到POD中
使用configMap的限制条件
1
2
| 1.ConfigMap必须在Pod之前创建,Pod才能引用他
2.ConfigMap受限于命名空间限制,只有处于同一个命名空间中的Pod才可以被引用
|
命令行创建ConfigMap
创建示例
1
2
3
4
5
6
7
8
9
10
11
12
13
14
15
16
17
18
19
20
21
22
23
24
25
26
27
28
29
30
31
32
33
34
35
36
37
38
39
40
41
42
43
44
45
46
47
48
49
|
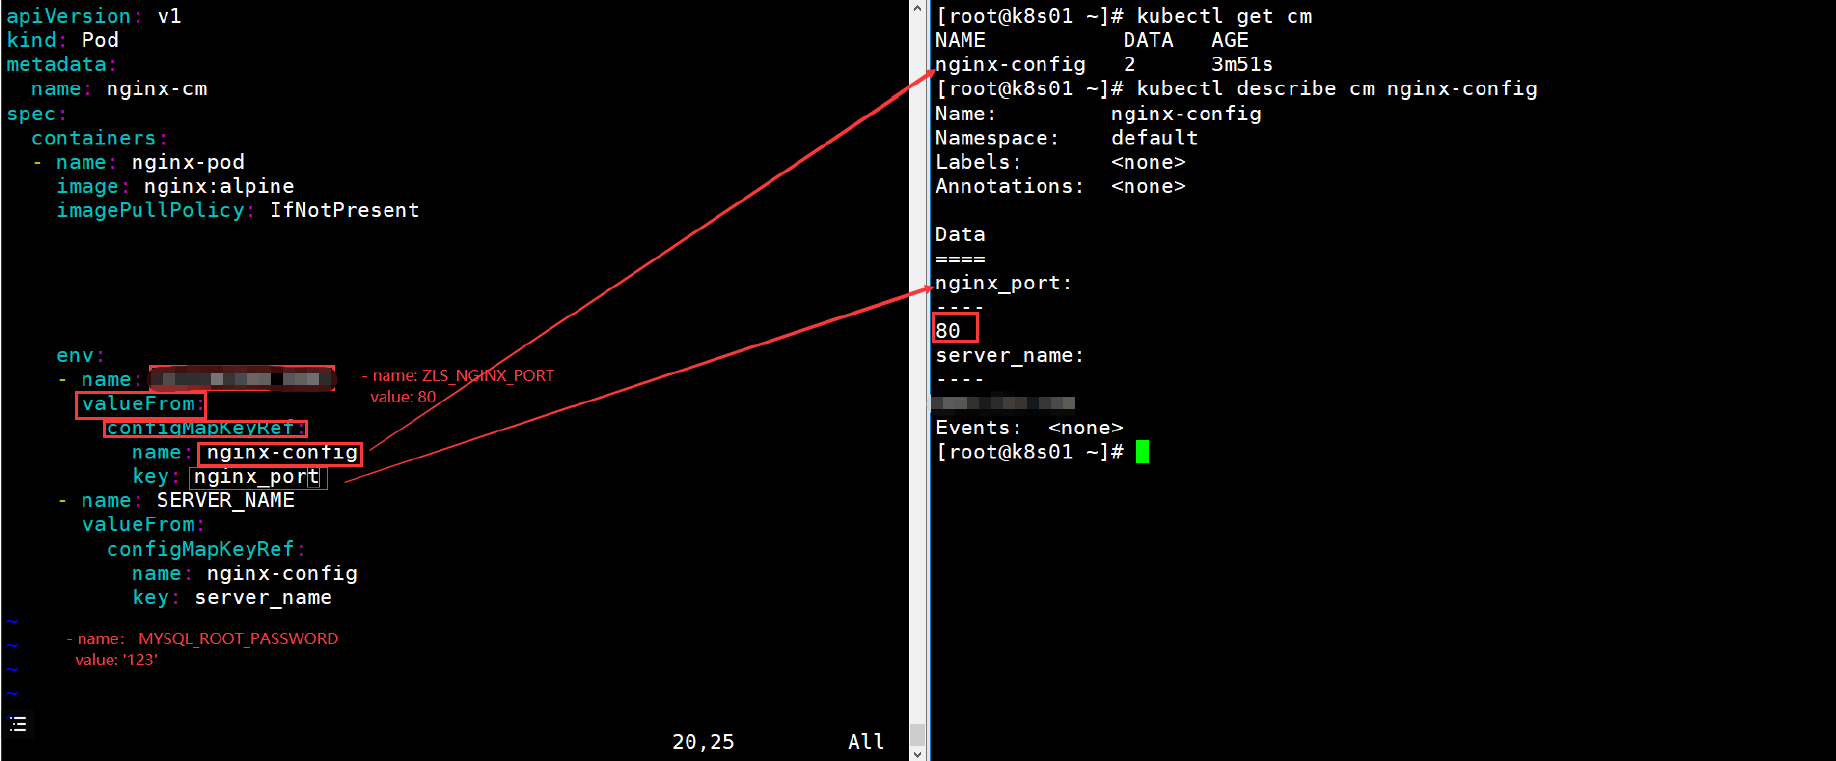
kubectl create configmap NAME [--from-file=[key=]source] [--fromliteral=key1=value1] [--dry-run=server|client|none]
kubectl create configmap nginx-config --from-literal=nginx_port=80 --fromliteral=server_name=www.hcl.com
kubectl get cm
NAME DATA AGE
nginx-config 2 6s
kubectl describe cm nginx-config
Name: nginx-config
Namespace: default
Labels: <none>
Annotations: <none>
Data
====
nginx_port:
----
80
server_name:
----
www.hcl.com
Events: <none>
apiVersion: v1
kind: Pod
metadata:
name: nginx-cm
spec:
containers:
- name: nginx-pod
image: nginx:alpine
imagePullPolicy: IfNotPresent
env:
- name: HCL_NGINX_PORT
valueFrom:
configMapKeyRef:
name: nginx-config
key: nginx_port
- name: SERVER_NAME
valueFrom:
configMapKeyRef:
name: nginx-config
key: server_name
|
1
2
3
4
5
6
7
8
9
10
11
12
13
14
15
16
17
18
19
20
21
22
23
24
25
26
27
28
29
30
31
32
33
|
kubectl describe pod nginx-cm
Name: nginx-cm
Namespace: default
Priority: 0
Node: k8s02/10.0.0.12
Start Time: Fri, 16 Jun 2023 11:24:03 +0800
Labels: <none>
Annotations: <none>
Status: Running
IP: 10.2.2.162
IPs:
IP: 10.2.2.162
Containers:
nginx-pod:
Container ID:docker://074e4c98437a36246cc8b9cb15495821b65210011e78c4927fccb5cd97a7b369
Image: nginx:alpine
Image ID: dockerpullable://nginx@sha256:eb05700fe7baa6890b74278e39b66b2ed1326831f9ec3ed4bdc6361a4ac2f333
Port: <none>
Host Port: <none>
State: Running
Started: Fri, 16 Jun 2023 11:24:05 +0800
Ready: True
Restart Count: 0
Environment:
HCL_NGINX_PORT: <set to the key 'nginx_port' of config map 'nginxconfig'> Optional: false
SERVER_NAME: <set to the key 'server_name' of config map 'nginxconfig'> Optional: false
valueFrom:
configMapKeyRef:
name: nginx-config
key: nginx_port
|
查看pod是否引入了变量
1
2
3
4
5
6
7
8
9
10
11
|
kubectl exec -it nginx-cm /bin/bash
root@nginx-cm:~
80
root@nginx-cm:~
www.hcl.com
root@nginx-cm:~
NGINX_PORT=80
SERVER_NAME=www.hcl.com
|
注意:
- 变量传递的形式,修改confMap的配置,POD内并不会生效
- 因为变量只有在创建POD的时候才会引用生效,POD一旦创建好,环境变量就不变了
构建带有环境变量的镜像
1
2
3
4
5
6
7
8
9
10
11
12
13
14
15
16
17
18
19
20
21
22
23
24
25
26
27
28
29
30
31
32
33
34
35
36
|
envsubst '${HOME},${PATH}' < cjavapy.txt > cjavapy1.txt
wordpress:
-e WORDPRESS_DB_HOST=...
-e WORDPRESS_DB_USER=...
-e WORDPRESS_DB_PASSWORD=...
-e WORDPRESS_DB_NAME=...
-e WORDPRESS_TABLE_PREFIX=...
FROM centos:7
RUN rm -f /etc/yum.repos.d/* && \
curl -o /etc/yum.repos.d/CentOS-Base.repo https://mirrors.aliyun.com/repo/Centos-7.repo && \
curl -o /etc/yum.repos.d/epel.repo https://mirrors.aliyun.com/repo/epel-7.repo
&& \
yum install -y gettext nginx && \
yum clean all && \
rm -f /etc/yum.repos.d/*
COPY wp-config-docker.php /
COPY start.sh /start.sh
CMD ["/bin/sh","/start.sh"]
vim start.sh
envsubst '$WP_USER,$WP_DB,$WP_PASS' < /wp-config-docker.php > /wp-config.php /sbin/nginx -g "daemon off;"
vim wp-config-docker.php
define( 'DB_NAME', getenv_docker('WORDPRESS_DB_NAME', "$WP_DB") );
/** Database username */
define( 'DB_USER', getenv_docker('WORDPRESS_DB_USER', "$WP_USER") );
/** Database password */
define( 'DB_PASSWORD', getenv_docker('WORDPRESS_DB_PASSWORD', "$WP_PASS") );
|
使用配置文件创建ConfigMap
创建示例
1
2
3
4
5
6
7
8
9
10
11
12
13
14
15
16
17
18
19
20
21
22
23
24
25
26
27
28
29
30
31
32
33
34
35
36
37
38
39
40
41
42
43
44
45
46
47
48
49
50
51
52
53
54
55
56
|
server {
listen 80;
server_name www.hcl.com;
location / {
root /usr/share/nginx/html/www;
index index.html index.htm;
}
}
kubectl create configmap nginx-blog --from-file=blog.conf=./blog.hcl.com.conf
kubectl describe cm nginx-blog
Name: nginx-blog
Namespace: default
Labels: <none>
Annotations: <none>
Data
====
blog.conf:
----
server {
listen 80;
server_name www.hcl.com;
location / {
root /usr/share/nginx/html/www;
index index.html index.htm;
}
}
Events: <none>
apiVersion: v1
kind: Pod
metadata:
name: nginx-cm
spec:
containers:
- name: nginx-pod
image: nginx:1.14.0
ports:
- name: http
containerPort: 80
volumeMounts:
- name: nginx-www
mountPath: /etc/nginx/conf.d/
volumes:
- name: nginx-www
configMap:
name: nginx-www
items:
- key: www.conf
path: www.conf
|
1
2
|
kubectl edit cm nginx-blog
|
使用资源清单创建ConfigMap
configmap资源清单
编辑资源清单
1
2
3
4
5
6
7
8
9
10
11
12
13
14
15
16
17
18
19
20
21
22
23
24
| vim nginx-cm-test.yaml
apiVersion: v1
kind: ConfigMap
metadata:
name: new-nginx
data:
zh.conf: |
server {
listen 80;
server_name zh.hcl.com;
location / {
root /usr/share/nginx/html/zh;
index index.html index.htm;
}
}
wp.conf: |
server {
listen 80;
server_name blog.hcl.com;
location / {
root /usr/share/nginx/html/blog;
index index.html index.htm;
}
}
|
应用资源清单并查看
1
2
3
4
5
6
7
8
9
10
11
12
13
14
15
16
17
18
19
20
21
22
23
24
25
26
27
28
29
30
31
32
33
34
35
36
37
38
39
40
|
kubectl apply -f nginx-cm-test.yaml
kubectl get cm
NAME DATA AGE
new-nginx 2 4s
kubectl describe cm new-nginx
Name: new-nginx
Namespace: default
Labels: <none>
Annotations: <none>
Data
====
wp.conf:
----
server {
listen 80;
server_name blog.hcl.com;
location / {
root /usr/share/nginx/html/blog;
index index.html index.htm;
}
}
zh.conf:
----
server {
listen 80;
server_name zh.hcl.com;
location / {
root /usr/share/nginx/html/zh;
index index.html index.htm;
}
}
Events: <none>
|
使用pod挂载
1
2
3
4
5
6
7
8
9
10
11
12
13
14
15
16
17
18
19
20
21
22
23
24
25
26
|
vim pod.yaml
apiVersion: v1
kind: Pod
metadata:
name: new-nginx-pod
spec:
volumes:
- name: zh-wp
configMap:
name: new-nginx
items:
- key: zh.conf
path: zh.hcl.com.conf
- key: wp.conf
path: blog.hcl.com.conf
containers:
- name: nginx-pod
image: nginx:alpine
volumeMounts:
- name: zh-wp
mountPath: /etc/nginx/conf.d/
kubectl exec -it new-nginx-pod /bin/sh
|
容器内
1
2
3
4
5
6
7
8
9
10
11
12
13
14
15
16
17
18
19
20
21
22
23
24
25
26
27
28
|
cd /etc/nginx/conf.d/
/etc/nginx/conf.d
blog.hcl.com.conf zh.hcl.com.conf
/etc/nginx/conf.d
server {
listen 80;
server_name blog.hcl.com;
location / {
root /usr/share/nginx/html/blog;
index index.html index.htm;
}
}
/etc/nginx/conf.d
server {
listen 80;
server_name zh.hcl.com;
location / {
root /usr/share/nginx/html/zh;
index index.html index.htm;
}
}
|
作业:
1.Dockerfile自己打wordpress镜像使用环境变量
2.k8s启动自己打的镜像
3.使用www用户
4.nfs共享存储
5.名称空间:www
6.wp:2 mysql:1
7.wordpress:使用pvc 5G
mysql:使用pvc 10G

 wechat
 alipay

